The following gives an overview on how the Phone Shell (phosh) and the Phone Comppositor (phoc) get information about a device’s display notches and how you can add support for new devices.
Disclaimer: I’m a Librem 5 user so I don’t have to worry about notches and cutouts at all. I basically wrote the initial notch implementations to make it easier to use phosh on non Linux first devices. It’s also possible that future Librem 5 iterations might use more available screen estate and hence might also have notches so it’s good to be prepared.
A notch is a (usually non rectangular) area of a display without any usable pixels. It’s often a cutout that e.g. contains the camera. They’re usually at the top of the display and hence would partially overlay phosh’s top bar. Here’s some examples showing the shape of notches on some common devices:
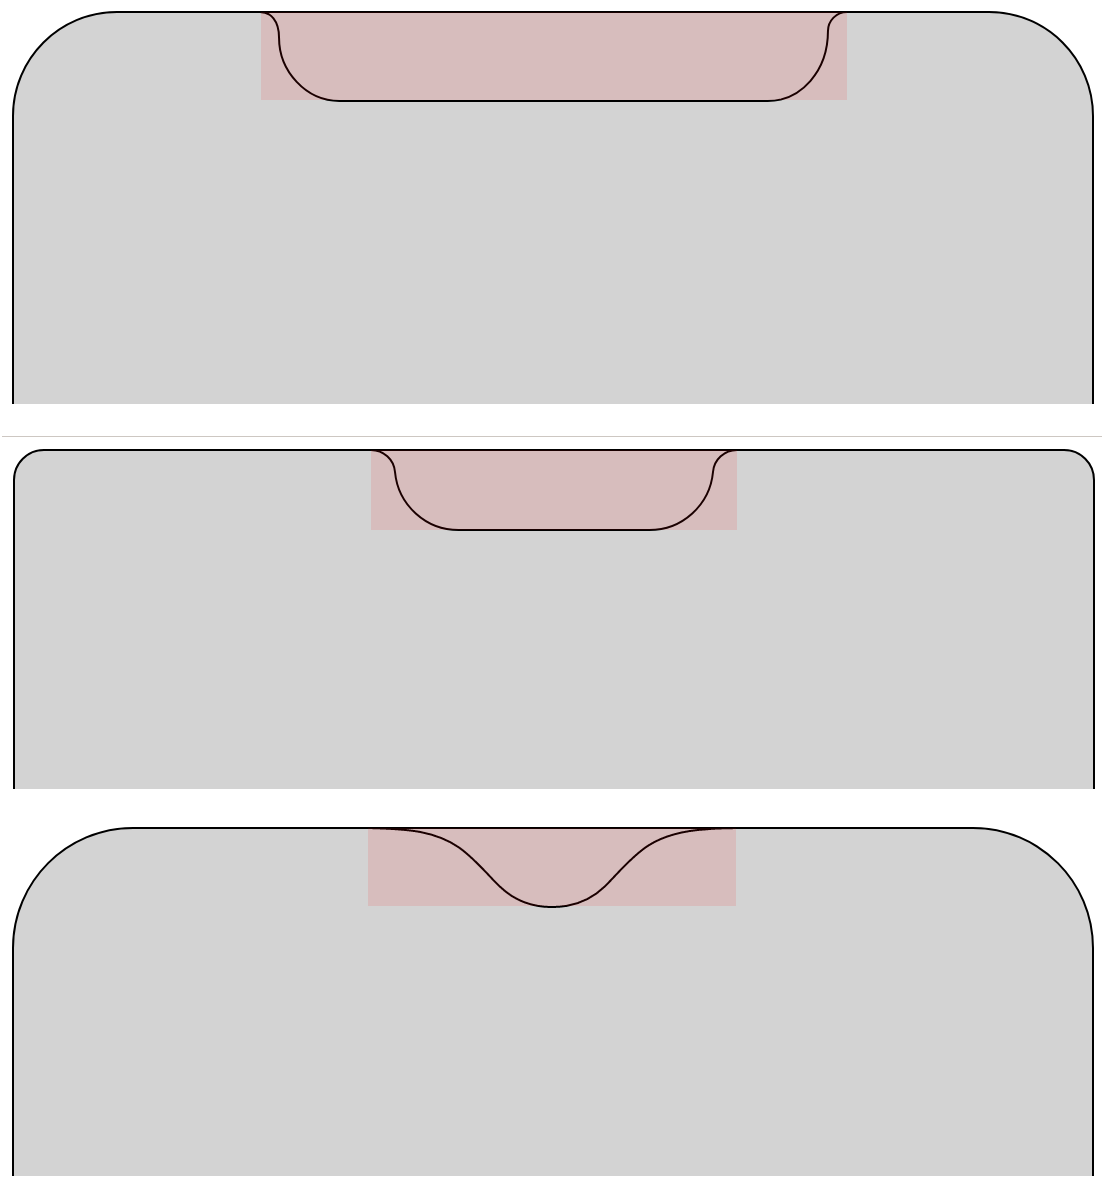
Notches are frequently found on phones but also on tablets and also some laptops have display cutouts. So in the following by device we mean the device with the cutout independent from it’s form factor.
As of 0.29.0 phosh automatically tries to avoid a notch if it has the necessary information about the device it runs on. If so it tries to move UI elements around to not overlap with the notch. This mode of operation is on by default and can be disabled via
gsettings set sm.puri.phosh shell-layout none
To reenable this feature use either one of:
gsettings reset sm.puri.phosh shell-layout
or
gsettings set sm.puri.phosh shell-layout device
In order to get the needed information phosh uses a small library called gmobile that contains classes to represent a display and it’s cutouts and also the information for various devices. The code is split out into a libarary so other projects (e.g. Wayland compositors) can reuse it.
Shouldn’t this information be provided by the kernel? That would be nice (discussion around this stalled a while back) but having it in userspace for all devices also has an upside: we can easily use it in tests to emulate different devices by just telling a Wayland compositor or phosh that it should assume a certain device type and hence it’s notches. This is possible with phoc already, more on that below.
Looking at existing device information Link to heading
Here’s how to see what device information is already available in gmobile, how it’s structured and how to preview it:
First clone the gmobile library and it’s data:
git clone https://gitlab.gnome.org/guidog/gmobile
cd gmobile
You can then see for devices there’s display panel information:
$ ls -1 data/devices/display-panels/
oneplus,enchilada.json
oneplus,fajita.json
purism,librem5.json
xiaomi,beryllium.json
The information is stored in JSON files describing the display panel, it’s notches
and (possibly) rounded corners. Looking at one specific file
data/devices/display-panels/oneplus,fajita.json:
{
  "name": "Oneplus 6T",
  "x-res": 1080,
  "y-res": 2340,
  "border-radius": 120,
  "width": 68,
  "height": 145,
  "cutouts" : [
    {
      "name": "notch",
      "path": "M 355,0
        h 368.34
        c -9.77,0.44 -19.57,0.08 -29.28,1.24
        c -20.33,1.14 -41.18,5.17 -58.62,16.24
        c -16.9,10.79 -29.44,26.78 -43.44,40.81
        a 72.73,72.73 0 0 1 -38.29 19.58
        c -16.53,2.51 -34,1 -49.09,-6.62
        c -9.85,-4.62 -17.88,-12.24 -25.21,-20.18
        c -10.46,-11.27 -20.9,-22.75 -33.53,-31.66
        c -11.49,-8 -24.9,-12.78 -38.53,-15.42
        c -17.27,-3.18 -34.86,-3.6 -52.35,-3.99
        Z"
    }
  ]
}
The file name of the JSON file is the device-tree compatible you want
to match on (we’ll see how to get that in a moment). x-res and
y-res are th devices maximum resolution and cutouts is an array of
cutouts each described via a closed SVG path. In the above M is a
movement, the cs indicate Cubic Béziers curves, h is an horizontal
line and Z closes the path. Mozilla has a good
introduction
on how SVG paths work.
We take the display panels top left corner as 0,0 of the coordinate
system. Each SVG path should describe exactly one cutout as closely as
possible.
How the cutouts look is easy to test. First we build gmobile:
meson setup _build
We can then use the gm-panel-preview tool to preview cutouts and the cutouts
bounding boxes (the area that shouldn’t be used by UI elements) for a certain device
(here a oneplus,fajita):
_build/examples/gm-display-panel-preview -c oneplus,fajita -o oneplus,fajita.html
The generated HTML file contains an SVG of the display’s boundaries and it’s notches. To display it you can use any web browser:
epiphany oneplus,fajita.html
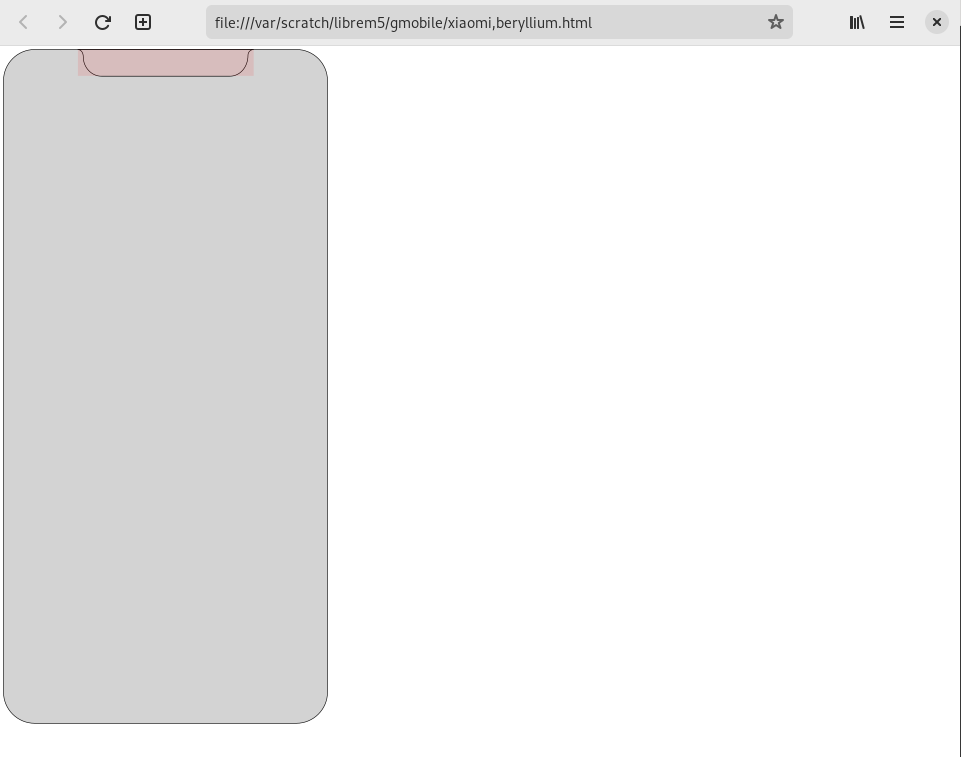
While the HTML rendering has the advantage of showing us the exact cutout path we don’t see how UI elements would be laid out.
For this we can run phosh and phoc nested and see how phosh looks with the given information. For that you need phosh and phoc on your laptop or PC (as explained here). As there’s a bunch of environment variables needed for things to work right gmobile wraps this in a single command:
_build//examples/gm-display-panel-run-phosh -s 3 -c oneplus,fajita
So what happens in that command is that we
- build a phoc.ini with the device’s resolution for the given device compatible and the scaling given on the command line
- tell phoc and phosh to assume they’re running on a
oneplus,fajita - tell phoc to render the display cutouts and rounded edges in semi transparent purple so that we can see easily if UI elements overlap with the notch or corners
- tell phosh to use it’s layout-manager although it’s running on a emulated device
The result should look like this:
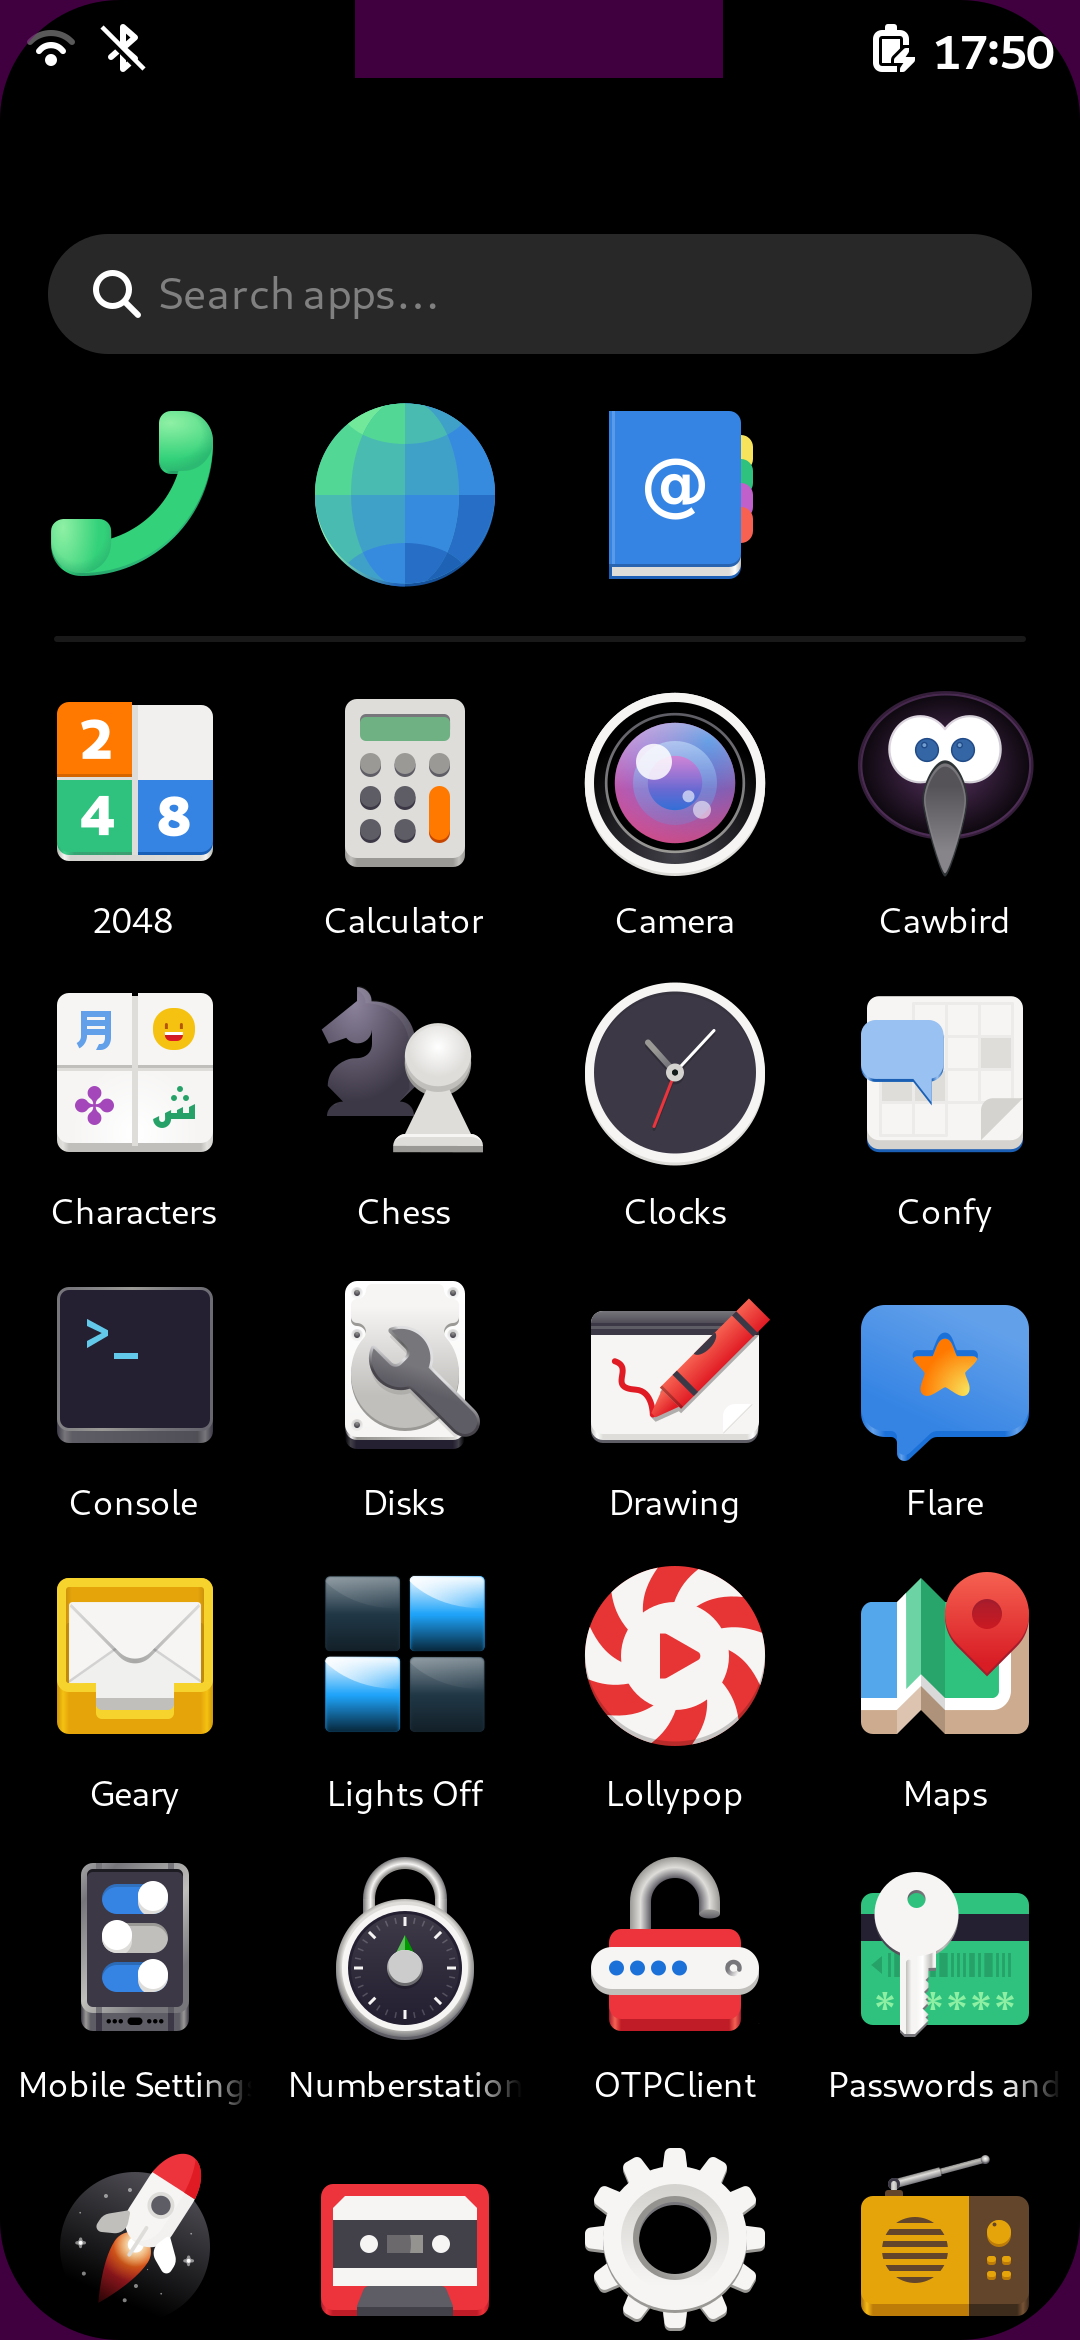
Note how the clock was moved from the default center to the right.
But what if we want to add a new device? Do we need to
rebuild things so phosh and phoc know about it? Fortunately no, we can
use glib’s G_RESOURCE_OVERLAYS for testing
and hence don’t need to rebuild anything. We can also do most of the
development in the nested session before moving to the actual device.
Adding a new device Link to heading
To add a new device we need to know
- The device tree compatible string to determine the target file name
- The device panels maximum resolution to fill in the
x-resandy-resproperties - Information about the cutouts as SVG path to fill in the cutout
path.
The compatibles string Link to heading
compatibles are used in the Linux kernel to figure out which drivers to bind
for a bit of hardware and of the form <manufacturer>,<model>.
The base compatible that identifies the device itself
is exported by the kernel at /sys/firmware/devicetree/base/compatible. Let’s assume our
device is from manufacturer mycorp and the model is fantastic so this could look like:
$ sed -z 's/$/\n/' /sys/firmware/devicetree/base/compatible
mycorp,fantastic-r3
mycorp,fantastic
fsl,imx8mq
mycorp,fantastic-r3 would be very specific as it would only match the
3rd revision. Since all Fantastic’s so far have the same panel we’d pick
mycorp,fantastic. This gives us the filename of the file we’d put the display
panel information: data/devices/display-panels/mycorp,fantastic.json.
The display resultion Link to heading
We can get the display resolution via wlr-randr and have the first bits of
the display-panel information filled in:
{
  "name": "Mycorp Librem 5",
  "x-res": 720,
  "y-res": 1440
}
Information about the cutouts Link to heading
If you want to add a device that formerly ran Android have a look at the device overlay’s config.xml (example). There you should find an SVG path that is pretty close to what you need. You just need to shift it right by half the display width. If you can’t find such a file you can construct the SVG path with a vector graphics program that handles SVG like Inkscape.
For our made up device we just make up some notch information. Let’s assume there’s a small notch in the middle for the camera:
{
  "name": "Mycorp Fantastic",
  "x-res": 720,
  "y-res": 1440,
  "cutouts" : [
    {
      "name": "notch",
      "path": "M 336 0
               A 24 24 0 0 0 384 0
               Z"
    }
  ]
}
You can check at any time if your file is parseable via
json-glib-validate data/devices/display-panels/mycorp,fantastic.json
With that passing we can again render the display panel as HTML and run a nested
phosh session for testing. As we don’t want to rebuild and commit our changes yet we
use the above mentioned GResource overlay:
export G_RESOURCE_OVERLAYS=/org/gnome/gmobile/devices/display-panels=$PWD/data/devices/display-panels
_build/examples/gm-display-panel-preview -c mycorp,fantastic -o mycorp,fantastic.html
epiphany mycorp,fantastic.html
G_RESOURCE_OVERLAYS=/org/gnome/gmobile/devices/display-panels= is
fixed and $PWD/data/devices/display-panels is the path to the
directory where you put the mycorp,fantastic.json.
The result should look like this (The screenshot only shows the interesting top part):

And if we want to check in our nested phosh session:
export G_RESOURCE_OVERLAYS=/org/gnome/gmobile/devices/display-panels=$PWD/data/devices/display-panels
_build//examples/gm-display-panel-run-phosh -s 2 -c mycorp,fantastic
The result should look like:
Finally we can check the changes the “Mycorp Fantastic” device itself. For that we copy
the mycorp,fantastic.json onto the device (e.g. via scp) and use GResource overlay again.
Let’s assume we put mycorp,fantastic.json at
/tmp/mycorp,fantastic.json on the device for testing purposes. We’d
then want to put
G_RESOURCE_OVERLAYS=/org/gnome/gmobile/devices/display-panels=/tmp
into phosh’s environment so it can find and use that file. How that works exactly depends a bit on your distribution and display manager. If you’re using the systemd unit to start phosh (e.g. on PureOS) you can just add an override:
mkdir -p /etc/systemd/system/phosh.service.d/
cat <<EOF > /etc/systemd/system/phosh.service.d/override.conf
[Service]
Environment=PHOC_DEBUG=cutouts
Environment=G_RESOURCE_OVERLAYS=/org/gnome/gmobile/devices/display-panels=/tmp
EOF
systemctl daemon-reload
systemctl restart phosh
On pmOS using tinydm you’d put that information into
/etc/tinydm.d/env-wayland.d:
mkdir -p /etc/tinydm.d/env-wayland.d
cat <<EOF /etc/tinydm.d/env-wayland.d/cutout-test
G_RESOURCE_OVERLAYS=/org/gnome/gmobile/devices/display-panels=/tmp
export G_RESOURCE_OVERLAYS
PHOC_DEBUG=cutouts
export PHOC_DEBUG
EOF
service tinydm restart
You can drop PHOC_DEBUG=cutouts if you don’t want phoc to render the
bounding box of the notch. Your device should now shift the clock to
avoid the notch.
Once you have tested on device that the cutouts are at the intended
locations you can add your newly added file and add an entry to
data/gmobile.gresources.xml. Now you could submit a merge request
against gmobile so it can be included to benefit other users as
well.
Summary / Outlook Link to heading
With the above we can have notches work out of the box when using phosh. However while shell and Wayland compositor have the necessary bits of information fullscreen applications don’t know about this yet. For that we need a Wayland protocol. Discussions around this have already started. We need to yet work out how represent that information to clients.
In the future we want to add support for display panels with curved
screen edges (aka waterfalls) and areas for under display cameras by
adding a type field to the cutout’s JSON. If you have such a device
feel free to submit a merge request or comment in the related
issue.